Newborn Cover Tutorial Using Fold Over Elastic
Want to make your baby's diapers? Our newborn cover tutorial is full of photos to show you how to sew a diaper cover using fold over elastic.

The Tutorial
This tutorial shows you how to sew a PUL cloth diaper cover with fold-over-elastic binding using the free newborn cover pattern available from Prefold2Fitted Blog. Please note that this pattern doesn't provide sewing instructions or fabric recommendations, but many patterns available for a charge do.
No
matter which pattern you prefer to use, the basics of this tutorial
will apply to most diaper covers that are finished with fold over elastic (FOE) binding.
Materials Needed to a Newborn Diaper Cover:
- Velcro or Aplix
- Fold Over Elastic
- Coordinating polyester thread
- Sewing machine with zig-zag stitch option
- Diaper cover pattern (I used Prefold2Fitted's free pattern)
- Optional: Snaps and snap press or pliers, and optional awl for marking snaps (if you wish to include the optional snap-down rise adjustment)
- Optional: Embellishments if desired
Most newborn diaper covers cost $12 and up, but with some basic sewing equipment and high quality fabrics, you can sew your own cute and equally effective covers for much less!
For this newborn cover tutorial, I'm using materials provided by Babyville Boutique. You can browse their full product assortment on Amazon.com's Babyville Boutique Store.
Babyville Boutique makes PUL fabrics in delightful prints and colorful
solids. They also offer a fun line of exclusive coordinates, including
fold-over elastic, hook and loop tape, snaps, and embellishments
including appliques and diaper tags. I received a sampling of coordinating fabrics and notions from their Playful Pond line. I was very impressed with the
quality of their fabrics, and loved how everything was perfectly
coordinated! For more information, read the full review of the Babyville Boutique products I tested.

Instructions to Make a Newborn Cover:
Print off your pattern, and trace it onto your fabric. Optional: If you are going to incorporate an adjustable rise to extend the length of your diaper, cut a second layer for the top portion of the diaper using PUL or other fabric for reinforcement, and then set the snaps through both layers of fabric according to the pattern, as shown below.

Next, stitch down the "landing strip" or front band of hook and loop take across the front of the diaper. You should use the "fuzzy" loop portion of the tape for the landing strip. The Babyville Boutique hook and loop comes in a nice wide tape, and I left about 3/4" of fabric at the top, since the top of the diaper will be bound with fold-over elastic later.

I went a little off the pattern at this point. The following photos detail how I added gussets to this newborn diaper cover. I love having a second barrier on newborns to protect against those messy diapers that only newborns can create. If you wish to add gussets, I would suggest you check out the tutorials for gussets on our Cloth Diaper Patterns page. I will show you how I incorporated them, but I'm not going to go into a ton of detail.

The pictures above and below show how I pinned the gussets along the leg opening of the diaper cover. If you want gussets, you should add them before you apply the fold-over elastic binding around the outside of the diaper cover.

Here's a picture that shows the gussets sewn in with a 1/4" seam allowance. Especially on small diapers like this newborn cover, sewing gussets in is a bit fussy, but it's definitely worth the effort if you can get the hang of it!
Now, we're back to the basic newborn cover tutorial again!
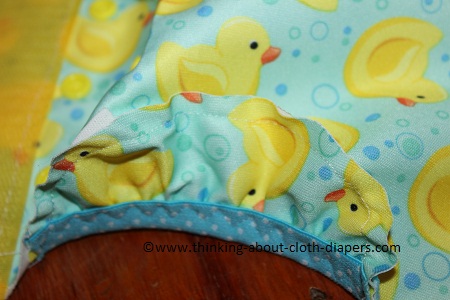
Now it's time to sew the fold-over elastic binding around the edges of your diaper cover, using a wide zig-zag stitch. I prefer to use a multi-stitch zig-zag, which makes the diaper a little bit neater. For a diaper cover, you will be pulling the elastic snug through the leg indents and across the back, and using no tension around the tabs and tummy. By snugging up around the legs and back, you'll get a diaper cover that offers a stretchy fit across the back and around the legs. As you stitch past the gussets, tuck the ends of that fold-over elastic in under the outside fold-over elastic so that everything finishes up neatly.

A little note on fold-over elastic (also called FOE): It can take a bit of practice to get really comfortable with fold-over elastic.
Below you can see the double gussets from the side. When the diaper's in use, this will create a second barrier to make sure that runny messes don't leak out onto your baby's clothing.

The next step in the newborn cover tutorial is to add the hook and loop tabs. You should use the prickly hook tape for these. Optional: If you wish to have "fold over laundry tabs", you can cut a small piece of the fuzzy loop tape and sew it beside the outside prickly hook square. I haven't completed this step for this diaper cover.
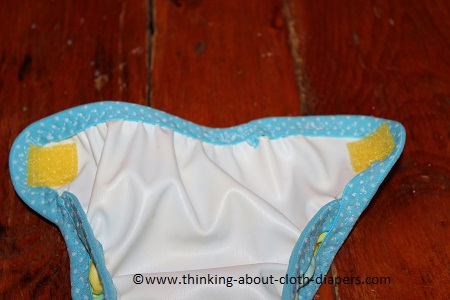
Almost done! Here's a picture of the inside of the diaper cover.

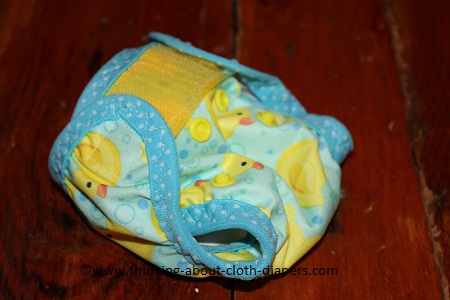
Here you can see the wide multi-stitch zig-zag stitch up close. To finish the fold-over elastic ends, sew them together so that the seam is facing inside the diaper (as shown in the top left corner of this photo below!) I also couldn't resist adding one of the cute Babyville Tags to the back of this diaper. Don't you think it makes the perfect finishing touch?

And here's a final image of the our newborn diaper cover! It's so tiny and cute!
If you liked the fabrics I used in this newborn cover tutorial, be sure to look for the exclusive line from Babyville Boutique. Babyville Boutique products are carried by many independent fabric stores, as well as Joann's, Hancock Fabrics, and Fabricland, and are also available through Amazon.com.
Do you plan to make your own diapers?
Let me know below! If you try out this newborn cover tutorial, I would love it if you would share a photo of your finished diaper cover on our Facebook page!
Sponsor Love

Disclosure: Babyville Boutique provided me with a sampler of cloth diaper fabrics and notions to facilitate this newborn cover tutorial. The opinions expressed in this post are entirely my own, and your experience with the product may differ from mine. I only recommend products or services I use personally and believe will be good for my readers. This article contains affiliate links. I am disclosing this in accordance with the Federal Trade Commission’s 16 CFR, Part 255: “Guides Concerning the Use of Endorsements and Testimonials in Advertising.” For more information, see our Disclaimer and Copyright.
For information on cloth diaper fabric and pattern suggestions, go back to Making Cloth Diapers.
At Thinking About Cloth Diapers, we offer reliable, up-to-date cloth
diaper research to save you time so you can get on with the other things
you want to do.
Return to Thinking About Cloth Diapers homepage.
Sponsor Love


Cloth diapers don’t have to be hard, but with so much information available, they can seem overwhelming! My name is Jenn, and I'm also the mom behind the site All About Cloth Diapers. I hope this site helps you easily find the information you need to start using (and keep using) cloth diapers! [More]
