How to Make a Simple Wet Bag in 20 Minutes or Less
Make a simple wet bag in 20 minutes or less following our photo tutorial. Perfect for beginner sewers or anyone who wants to make a wet bag or two during your little one's nap! You'll need a piece of PUL, a zipper, and no more than 20 minutes to create a great little bag to carry your wet diapers around!

Materials Needed to Make a Simple Wet Bag:
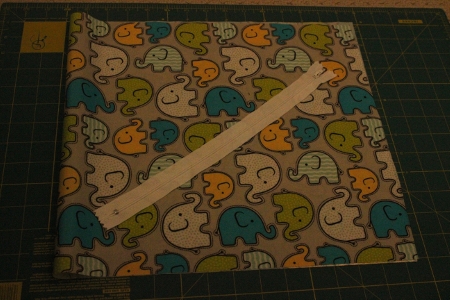
- 1 piece of PUL (13x31")
- 1 12" zipper - I like the fine-tooth zippers
- Coordinating polyester thread
- Sewing machine, preferably with a zipper foot
I bought this cute elephant print PUL from Soft n Natural Fabrics. They have an excellent selection of PUL, sold by the yard. This one was $13.99 per yard, while their solids run around $8 per yard. You can get about 4 wet bags out of 1 yard of fabric.
Alternatively, Amazon.com also has a good selection of affordable PUL fabrics, or check out our other cloth diaper fabric store suggestions. If you've never sewn with PUL before, I recommend starting with a "sandwich" PUL from Wazoodle (the laminate is between 2 layers of polyester). Single layer PUL can catch on your sewing machine, so it takes some practice to get a smooth finish!
Instructions to Make a Simple Wet Bag
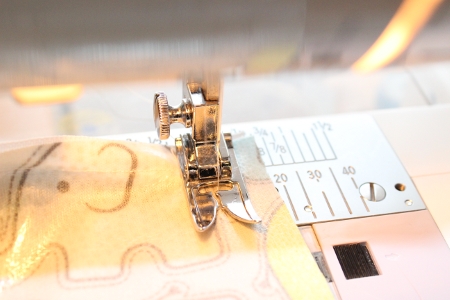
On one of the 13" sides of the fabric, lay the zipper face up, and the outside (knit) side of the PUL face-down, and sew as close to the zipper as you can. It's best to use a zipper foot on your sewing machine if you have one, as you can get much closer to the zipper.
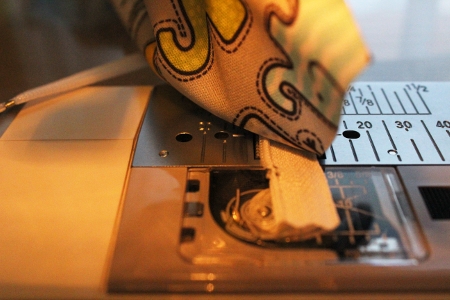
Next, fold the bottom 13" side of the PUL up to the other side of the zipper, as shown below. This will mean that the right sides (print side) of the PUL will be facing together.
Again, stitch using a zipper foot, getting as close to the zipper as possible.

Next, we will stitch down the sides. You will need to switch back from the zipper foot to your regular presser foot. I have shown one seam with a serger, sewing with a 5/8" seam allowance.
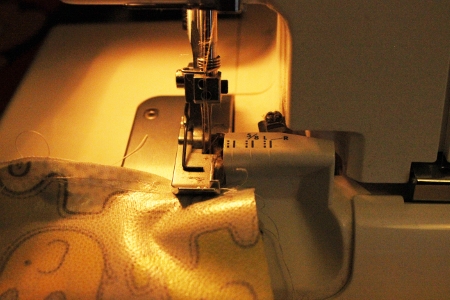
NOTE: Be sure to sew the ends of the zipper facing up. This way, when you turn the bag, the zipper ends will face "into" the bag. Before you sew the second side closed, be sure to open your zipper part way. You won't be able to turn the bag right-side out if you don't!
If you don't have a serger (and most people don't!) you can just as easily sew a straight seam down each side with your regular sewing machine, using a 5/8" seam allowance.
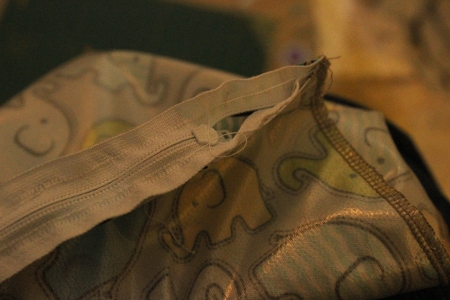
What's really nice about PUL is that it doesn't unravel, so you don't need to worry about finishing the edges of it at all - unless you really want to!
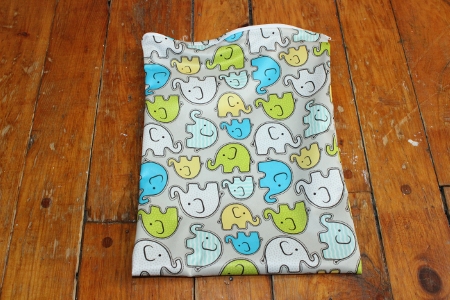
Last step: turn the bag right-side out, and admire your new wet bag!
If you wish, you can add a loop or handle to your wet bag. We have a more advanced tutorial for a lined zippered wet bag, which includes instructions for a handle. You can check it out here!
For more do-it-yourself cloth diapering projects and tutorials, go back to Making Cloth Diapers
At Thinking About Cloth Diapers, we offer reliable, up-to-date cloth
diaper research to save you time so you can get on with the other things
you want to do.
Return to Thinking About Cloth Diapers homepage.
Sponsor Love

Sponsor Love


Cloth diapers don’t have to be hard, but with so much information available, they can seem overwhelming! My name is Jenn, and I'm also the mom behind the site All About Cloth Diapers. I hope this site helps you easily find the information you need to start using (and keep using) cloth diapers! [More]
